skip to main |
skip to sidebar
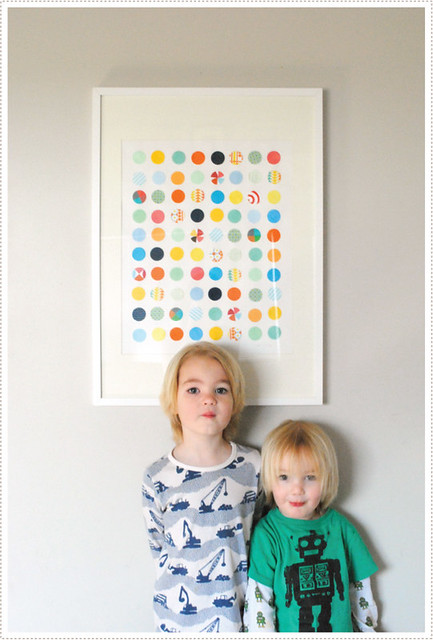
The boys and I had a fun weekend working on some artwork for their room. We've been in our new place for over six months and I think it's high time we got something on the walls, particularly in the boys room. I wanted to do something simple and graphic, and most importantly, something that the boys themselves could do, pretty much on their own. So we came up with a circle punch art idea.
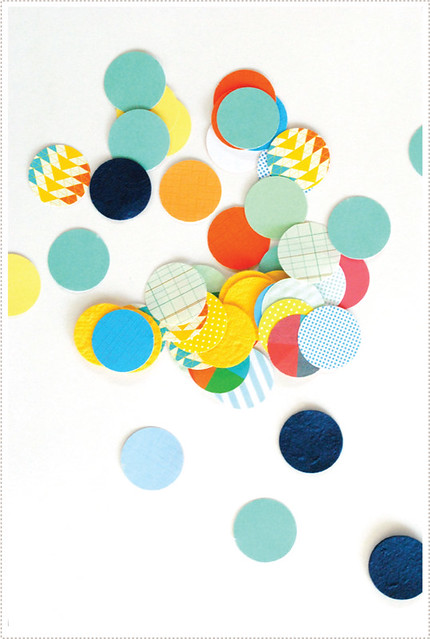
We started with several 1 1/4 inch circles punched out a various types of patterned and textured papers. Little A (5) was especially good at punching out the circles and did quite a few of them on his own. Little O (3) did a few as well but had to have help pushing the punch.

We decided to make our artwork based on a couple of 28 ¼" x 40 ¼" IKEA RIBBA frames that we had. So we cut a large sheet of white poster board to fit nicely in the frame, at least 1/2 inch larger, on all sides, than the mat window measurements of 27 ½" x 39 ¼".
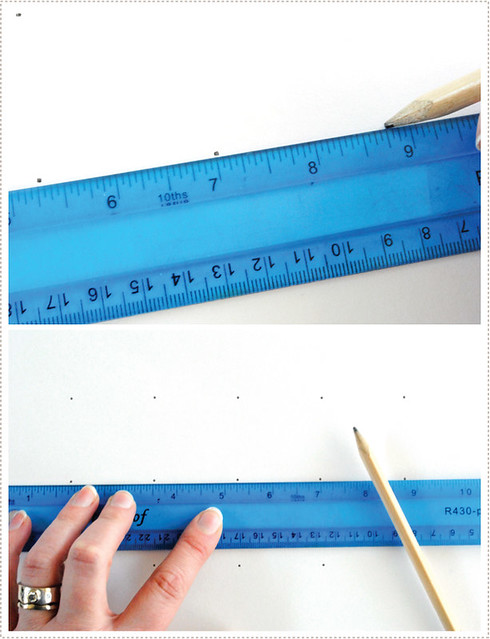
I then proceeded to measure out where we wanted the circles to go. I made little dots for where they boys could place the circles. I measured 1 3/4" between each one (I liked how the spacing looked at this distance but you can do whatever you feel looks good based on the size of your circles).
I then let the boys place the various circles on the marked grid.
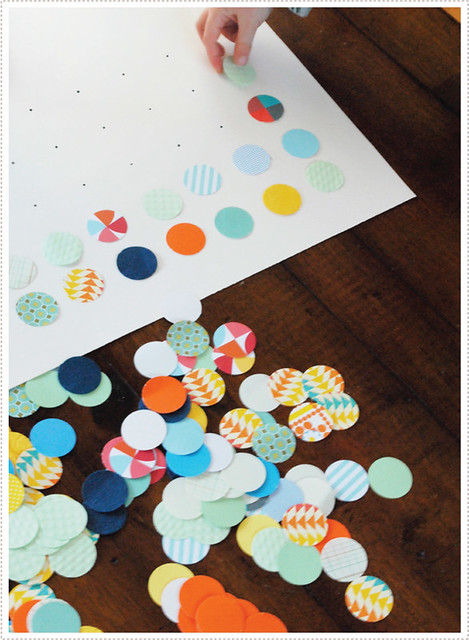
And let me tell you, they had a lot of fun doing this. I never know how they will react to certain craft projects and i was a little surprised at just how into this one they got. I think they really loved the freedom of it and how easy it was to figure out. They took turns placing the different circles (we are just laying them out at this point to see how things look, we didn't glue them down until the very end) and were delighted to see how things slowly came to life, the more circles they placed.
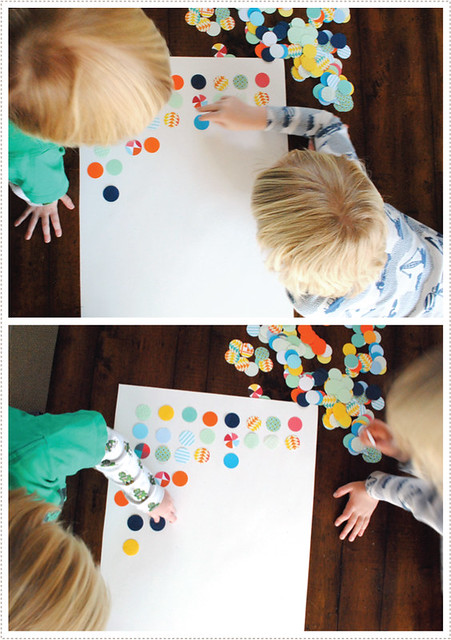
Little A was very particular about not using the same colored/patterned circle in one line. He also would notice if we didn't have a lot of circles in a particular color/pattern and was quick to punch out a few more so it would be more even. Little O was less concerned about that and just loved placing as many circles as he possibly could. Their different approaches definitely stressed each other out but we worked it out together. I also decided that we would do two of these so that each boy could have more ownership over one than the other and so that we could put each one over their beds.
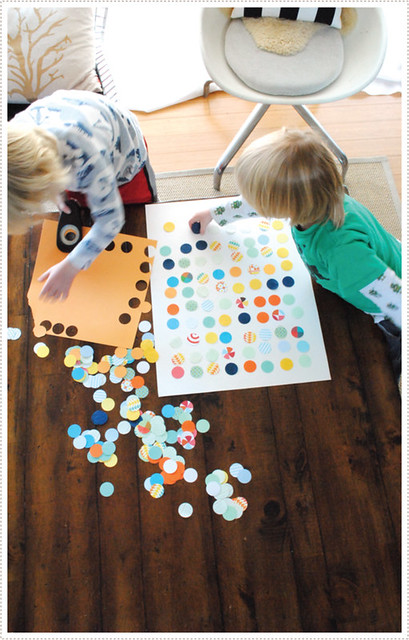
Once all the circles were laid out we talked about how we liked the look of things. I'd ask them questions such as "What do you think about all these blues and yellows together? Do you think we should space them out more and replace some with different colors and patterns?". I'm a big believer in helping your child see shapes, colors, patterns and just the general design of things. I think kids gain more confidence from an art project that has some limitations, helping them learn about good design, than I do from a free for all (which is, I concur, an appropriate approach for certain projects at certain times).
Once we were happy with the overall layout of the circles I had the boys glue them down (using the "dot, dot, not a lot" mantra), which they LOVED. We used simple Elmer's glue because that is what we had and to keep things easy for the boys, but you could use glue sticks or glue dots or really any type of adhesive you prefer. The boys took turns as to who would glue and who would place the circles. They loved each job immensely.

Once everything was glued down and dry, we placed the finished artwork in our frame. The boys really loved seeing their work presented with such prestige.
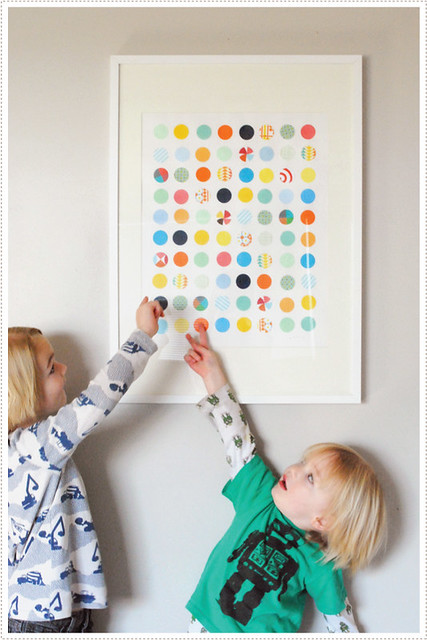
They also loved looking at particular circles they placed and were quick to point them out.

And like them, I'm so happy with the experience and how well the final product turned out. We did the second set of circles shortly after this one and I can't wait to put them above the boys beds!
(oh, and if you are thinking, "Little A needs a bit of haircut", well don't worry, he took matters into his own hands and snipped off the back of his hair yesterday...so no more mullet...and after a bit of repair...and a little lecture...it all ended up looking A-OK. Oh and we cut Little O's bangs so he can see now. :)).

Jon and I had noticed that our boys behavior had been especially out of sorts in recent months. We noticed a significant increase in the drama department early on in the beginning of the year when we returned home from our holiday travels. They weren't being creative, they didn't really play with their toys and they were fighting with us and each other non-stop.
Then we figured it out. The boys received a couple of WII games for Christmas (Little A's only request from Santa) and wanted to play them ALL the time. Of course we didn't let them play nonstop, but they still were exceptionally cranky and disobedient when they weren't playing or watching DVD's or TV. I tried to encourage them to play with their toys more, go outside and be more creative...but Little A rejected the notion wholeheartedly (not normal for him) and the whole ordeal usually ended in bouts of crying and writhing on the floor.
Something had to be done.
So we did it.
We pulled the plug.
No TV, No WII, No DVD's, No Netflix (which I think is choice overload for a small child and not my favorite platform for kids TV)...for a week, at least.
And little by little my sweet little creative, playful boys came back. They began imagining new things to do with their toys (such as line them all up a top their beds - which have been squished together during the colder months as Little O kept getting sick sleeping by the window) and they didn't come to me so much complaining of boredom.

Once things were back to normal for a decent amount of time we did let them watch a show or play a WII game here and there but we are now much more careful about monitoring their time with the tele and make sure that it stays very limited. And if things ever get out of sorts again...well...we know just what to do.
Have you ever experienced TV/Video Game sensory overload with your children? Do they act out? What are your back up plans keep things in check? Do you think this happens to adults as well? I'd love for you to share your tips!
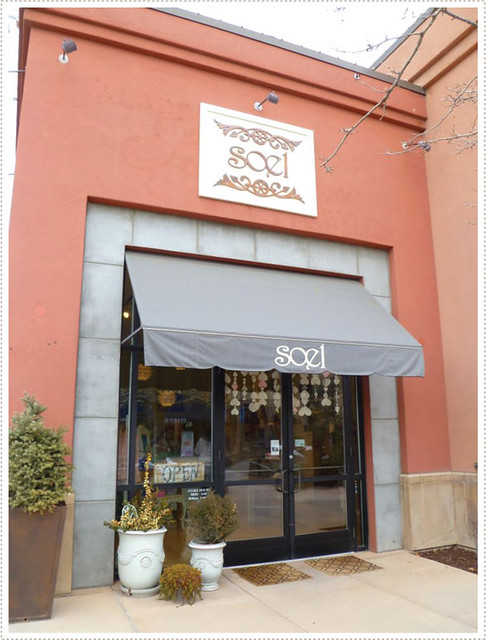
Hello friends! Will any of you be in the Provo, UT area this next Wednesday, Feb. 22 from 6:30-8pm? Well I will and would love to meet up. The lovely Jane (a.k.a, winner of the best hair at ALT - she's the one in the middle) and Soel Botique are teaming together to host a blogger meet and greet. Aside from the mega blogger meet up, ALT, I haven't ever done anything like this. I'm typically a bit of a hermit and don't get out and about as much as I should. But I'm excited to attend and hopefully meet many of you! And if that isn't enough, I'll be giving away two items from my shop, so come on over and get yourself some freebies! Oh, and there will be food. Win, win, right?
And of course a slew of talented bloggers will also be there, so you just have to come down. Here's the line up:
♥ sponsored by ♥
becky kimball * soel * see jane blog * milkglass and honey *
elsa bags * armelle * freshly picked * cotton & curls
modern palm * annily green * fifth and hazel * sycamore street press
zupas * {collected} * gatehouse no.1 * heirloom restaurant group
mer mag * the Alison show * the house of Smith's * Studio 5 See you on Wednesday! xo Mer

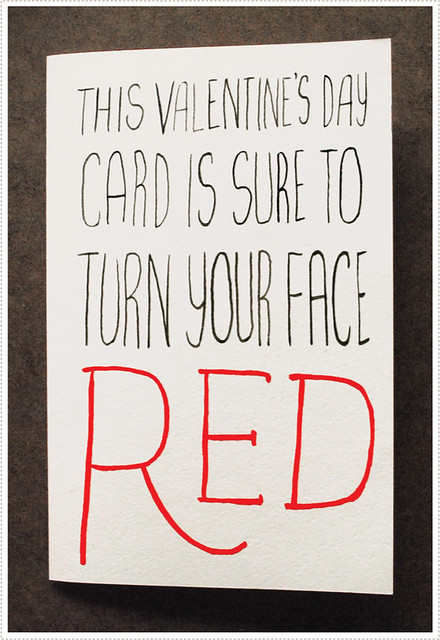
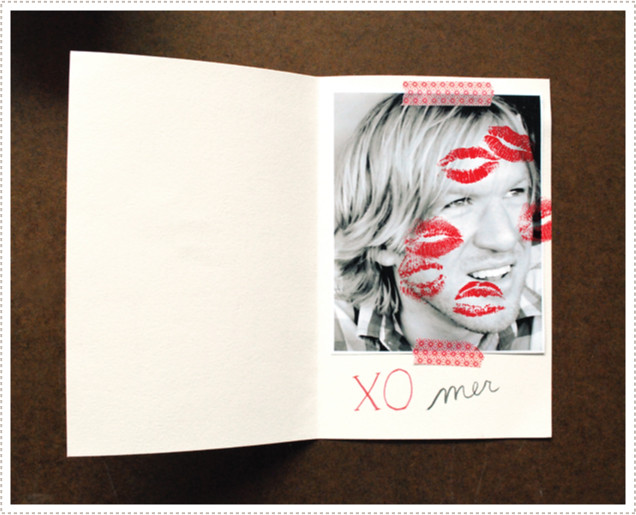
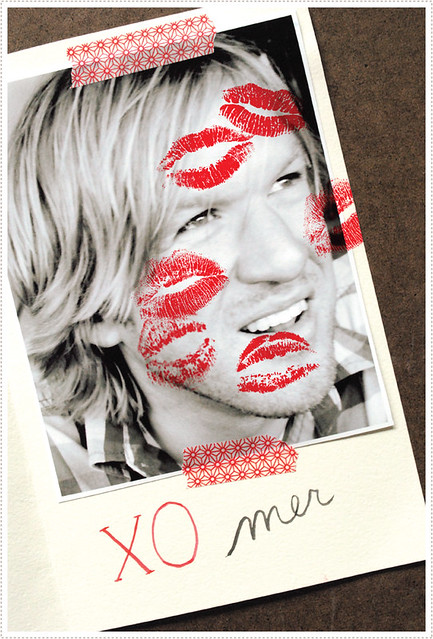
Happy Valentines Day friends! How is your day going so far? Jon spelled out J+M in a heart for me with chalk on the driveway which started the day out just right.
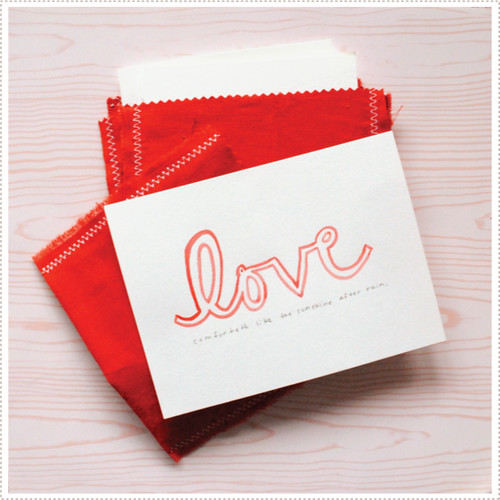
I've been stuffing my face with chocolates, decadent cookies and Cinnabun pancakes all week thanks to a wonderful Valentines exchange that I was lucky enough to attend over the weekend. Stephanie Ford, from Sycamore Street Press, hosted the get together at her swoon worthy abode and several of us gals brought unique Valentines to share with one another. For my contribution I decided to use watercolor to write out "love" on several different cards. I then added a little quote about love on each card and passed them out with a little chocolate treat.

I can't decide which card ended up being my favorite but I know I had a lot of fun making these. I love the idea of having Valentines parties for just the gals. Have you ever had a get together like this? If not, I highly suggest it.
Any exciting dinner plans for the evening? A night out with your sweetheart, the gals or just a comfortable night in with the family? That is most likely what we'll be doing. Jon and I used to really live up Valentines Day when we lived in NY. We decided it was our one day of the year to really splurge and celebrate each other and our marriage. I remember some melt in you mouth pasta from an Italian restaurant where there was a dress code and the waiters would come and brush away any crumbs that might fall on your table during the duration of your meal. And then there was Cafe des Artists where I had the most phenomenal fish dish in the world. And there was an Asian restaurant that was out of this world. I think it was a star hang out spot and I even think they have filmed a couple of movies there. They had the most gigantic Buddha I've ever seen. That place was a little too fast and furious for our taste but still a lot of fun. I'll have to ask Jon what the name of it was as I can't recall just now.
But for this year, well I think we'll avoid the crowds tonight and then go out on Saturday. I'll have to come up with something scrumptious to make here at home for this evening...will have to see...
Happy Valentines to you all and I hope you enjoy yourself thoroughly!
XO
mer
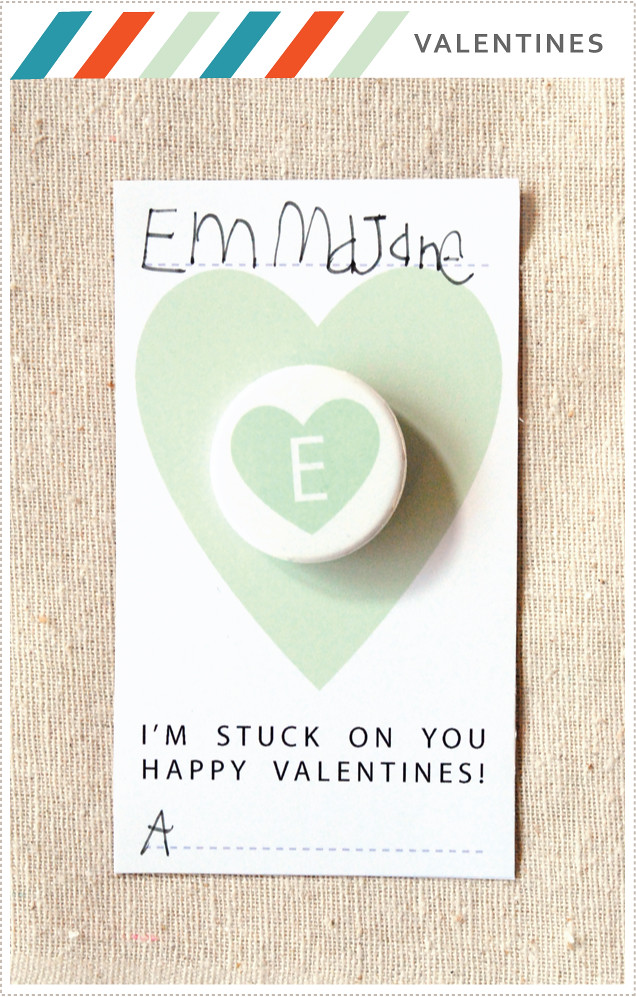
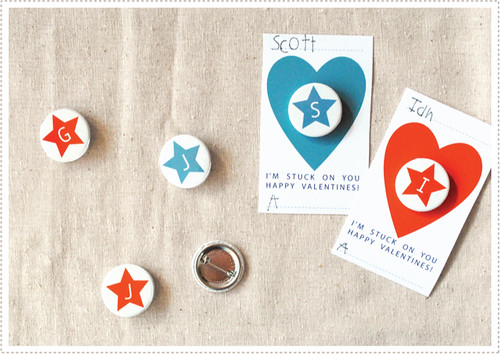
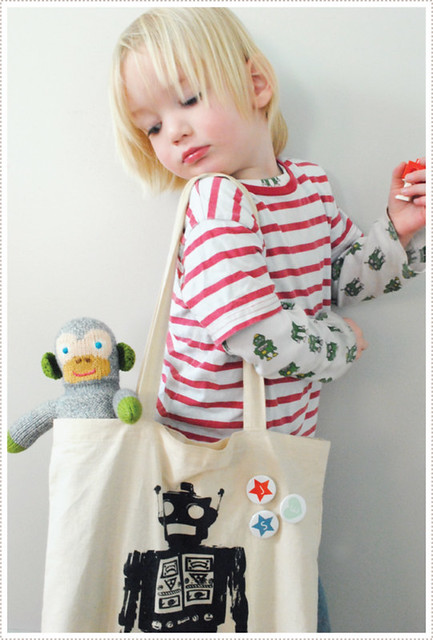
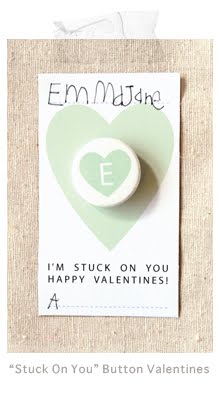
I had recently purchased a 1 1/4" button maker to make little buttons to sell in the shop and had been having some fun with it when I thought, "hey, we could make monogram buttons for all the kids in Little A's Kindergarten class this year for Valentines!". And well...that is just what we did.

The button maker I purchased was a little too complicated for Little A so I had to do the button making part for him. (But if you want to do this yourself, and want to get your kids more involved, there are several button makers geared for kids that are much more affordable and would work great for this craft. Here are just a few I've found online: 1. 2. & 3.).
I did have him help with punching the holes in the cards and adhering the buttons once they were finished. He loved doing this...in fact when he was struggling he wouldn't let me help him. He just kept on working at it until he got that hole punched into that card. I love his determination.

He then of course addressed all the cards out to his class mates. He was quite particular about it actually. I had a few monogram circles cut out, ready to be made into buttons, that had letters that didn't correspond to any of his classmates names and he was quick to let me know that they were of no use. I loved his little "mom, get it together" sigh whenever this happened.
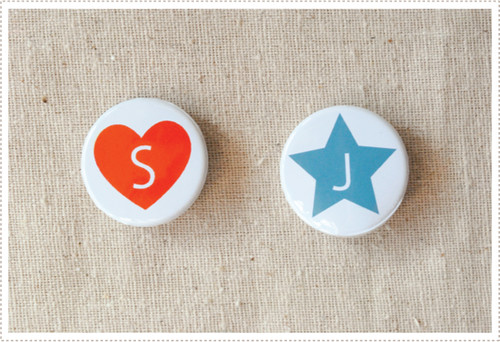
For the girls we went with the traditional heart motif on the buttons and a mint and red color scheme.

And for the boys we opted for a bit more universal route and went with a star motif (which Little A is completely into). And for the color scheme: indigo and red. And the cards still have a heart to keep with the Valentines theme.

We opted for an out-of-the-ordinary color scheme this Valentines. Last year we had so much fun delving into the traditional vibrant hues of season that we thought it would be fun to mix it up a bit this year. Little A loved the new look, and so do I.
And I do so hope that the recipients in Little A's class enjoy the the buttons as well.
Don't you think they would be so cute sported on backpacks and book bags?

I mean, wouldn't that be so perfect? I would have loved to get a little "M" button to wear around when I was in grade school (OK maybe I just want one now).
(Oh and I had Little O step in as a model as Little A was away at school...so if you are thinking...he doesn't look like a 5/6 yr old, you'd be right. He's 3...but was totally into the buttons. I want to have a little preschool Valentines card exchange party for him...don't you think that would be fun?).
We'd love to share this craft with you and have created a few PDFs for you to download should you chose to delve into button making for yourself (but I must warn you, you'll get addicted. Anything and everything will soon need to become a button...don't say I didn't warn you).
You can download the various PDF files individually here:
Red Valentine Heart Cards
Mint Valentine Heart Cards
Indigo Valentine Heart Cards
Red and Mint Heart Alphabet Button Templates
Red and Indigo Star Alphabet Button Templates
*and if you are interested in doing this project but don't want to purchase a button maker, then I would suggest downloading the alphabet hearts and stars and then printing them onto sticker paper. You could then punch them out and adhere them preexisting buttons (lots of places give them away for free) or just hand them out as stickers. You could still go with the "I'm Stuck On You" verbiage and everything.

Alison of the Alison Show, and The Little Tiny, is sharing the love this Valentines by hosting a round up of Valentines crafts just in time to get us ready to celebrate the holiday of L-O-V-E. She invited me to take part of the festivities and we came up with this fun little twist on "pillow talk". 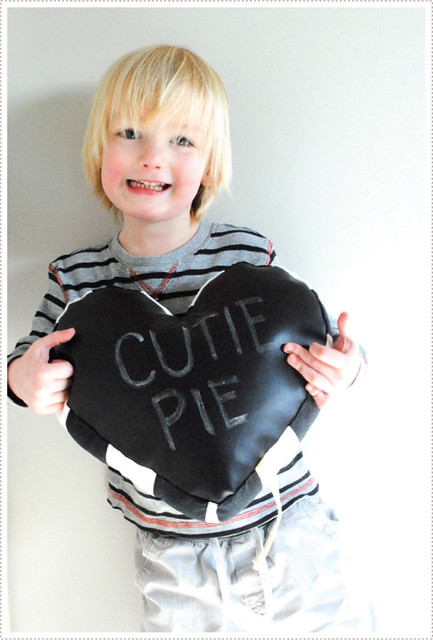 I love the idea of exchanging little messages to those you love a top a pillow - and a blackboard pillow nonetheless. A true "conversation heart", if you will. You could start by writing a little love note to your sweetheart and leave the pillow for them to discover. And then it would be their turn to leave a little note for you. The conversation of love could just go on and on... 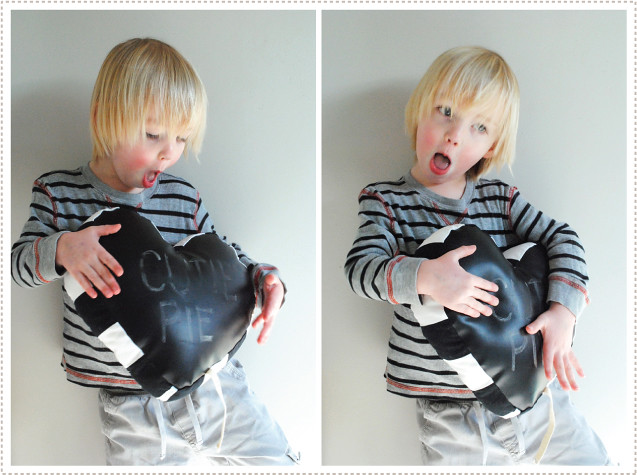 But don't leave out the littles, because they will love to join in on spreading the love around. 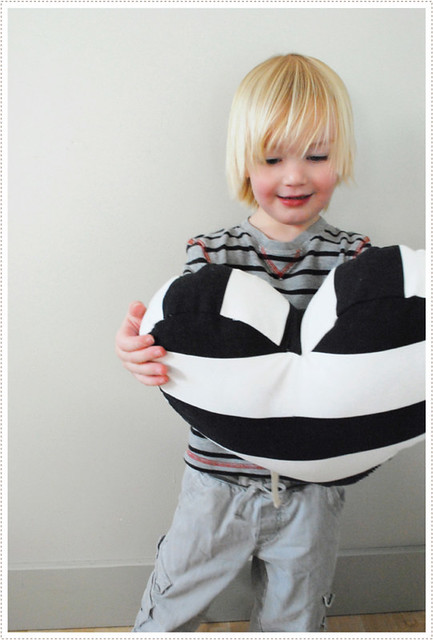 Little O really got into to it and loved being allowed to actually draw on one of mommy's pillows. And I loved seeing him so delighted and engaged. 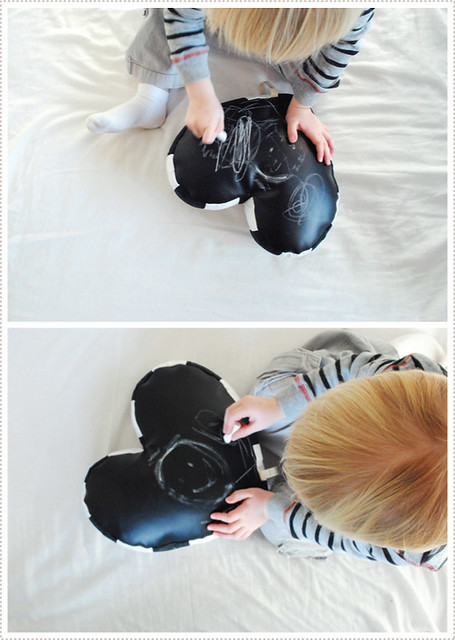 To make this you'll need to purchase blackboard fabric (I found my at Joann's) and contrasting fabric for the back and sides of the pillow. I referred to this tutorial when making the pillow. When using a stiff fabric I found it necessary to have an inset so this pattern worked well.  I also used webbing, alphabet stamps and multi-surface black ink pad to create a little "pillow talk" tag. 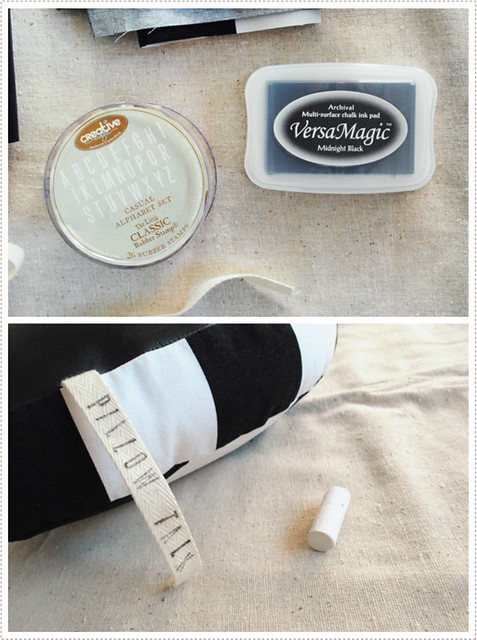 We've been having a lot of fun around here drawing and writing love notes. A great way to jump right into February and the season of love, if I do say so myself.  (simply wipe the pillow clean with a damp cloth, wait a bit for it to dry and then write another message to those you love!)
And don't forget to stay tuned for all the remaining Valentines posts Alison has in store for us. She has quite a line up! I know I for one can't wait to see what's up next!
Happy February!
|


